Hi
I am so excited that I have finally made the tutorial for this handbag. I have had so many requests.
I hope that it is easy for you to follow, any questions just leave me a message and I will respond asap.
Here is a photo of the finished product. (click on the photos to enlarge them)
Here is the recipe for this bag. ( You can substitute the cardstock and papers to ones of your choice)
3 x A4 sheets Riding Hood Red cardstock from Stampin Up (there will be quite a bit left over)
1 x sheet Bella Rose DP from Stampin Up
12 x Gold Brads (sorry, did not include these in the following photo)
4 x oval rings (mine are links cut from a chain)
White Gel Pen
Double sided tape or Snail adhesive
Paper Cutter
Round Tab Punch (Stampin Up)
Small Square Punch (Scissors will do the trick here if you dont have a square punch)
You will need to cut the following:
2 x 15cm x 23cm (5.9" x 9.1") rectangles from Bella Rose DP
2 x 29.7cm x 1.2cm (11.7" x .5") strips of Riding Hood Red cardstock
4 x 15cm x 1.2cm (5.9" x .5") strips of Riding Hood Red cardstock
2 x 5cm x 5cm (2" x 2") squares of Riding Hood Red Cardstock (once you have the squares cut these again on the diagonal so that you end up with 2 triangles from each square)
4 x punched Round Tabs
You will now need to reshape the Round Tabs
TheRound Tabs will be used to attached the handles of the bag.
Fold the Round Tabs in half and use one of the precut strips of cardstock to determine the width of the tab that will remain once the corners have been cut away. Mark the corners of all four Round Tabs with a pencil as shown in the photo. Use a square punch or scissors to cut away teh corners following the pencil lines until you are left with them looking like this.
Using the white gel pen, draw fake stitching around one half of the Round tab as shown. Place double sided tape on the back of the tab but not in the centre. Fold the half of the tab that does not have stitching gently in half trying not to crease it too much but just eough so that you can slip one of the oval rings over it and in to the centre of the tab.
You can now put these aside for the moment as they wont be needed till near the end of the project.
Now you can draw fake stitching on the follow pieces of the project as shown in the photo below
Ignore the two Round Tabs shown in this photo as you have already done those in the previous step.
Now take the two large rectangles of card stock and score them in the following way. Do not use gel pen as I have done in the photo, this was just done so you could clearly see where to score.
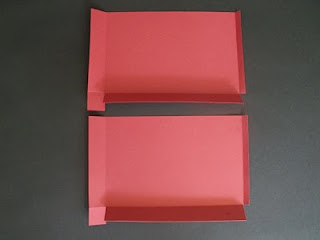
Score at 1cm (.4") at one short edge and 3cm (1.2") at the other short edge. Score at 3cm (1.2") at one long edge. You can use scissors to cut away the smale shaded rectangle shown in the above photo.
You should end up with it looking like this
Make a cut on the bottom edge as seen in the photo all the way up to the 3cm score line on both pieces. Click on the photo to enlarge so you can see more clearly what I mean.
Now using double sided tape or SNAIL adhesive stick the DP rectangles to the Cardstock rectangles as shown below
Using double sided tape or Snail adhesive stick the 15cm Strips and triangles to the sides of the handbag as shown in the photo below.
now attach the Round Tabs to the top of the sides of the handbag as shown in the photo below
fold the Round Tab over the top edge of the sides of the handbag with the half of the tab with the stitching on it facing out.
Put some double sided tape on the back of the two remaining long strips of cardstock as shown below These form the straps of the handbag.
Attached the straps to the handbag via the oval rings as shown below.
After attaching both straps then you can joing both sides together with a strip of double sided tape on the the 1cm scored edge and placing a 3cm scored edge on top of it.
Place double sided tape on the other 1cm scored edge and the 3cm scored edge at the bottom as shown in the photo below but do not complete folding the handbag together just yet.
put the gold brads in to place as shown in the photo below.
now you can finish folding the handbag together and you are done!
I do hope that this tutorial has made sense and is easy enough to follow.
Happy crafting!!
Michelle


4 comments:
Beautiful! Thank you for the tutorial. Where do you get the oval ring? They made the bag look real.
Hi Helen
The oval rings are actually links from a chain. I bought the chain from the local hardware store.
Thanks for stopping by my blog today!
Michelle
Oh thank you so much! This is a terrific project. You are so creative. Can't wait to see what you come up with next.
Wow thanks for the great Tutorial will have to give this a go!
hugs
Sue x
Post a Comment