Showing posts with label Anything but a card. Show all posts

Monday, February 27, 2012

MIM #78 with Di's Digi Downloads

Hi 

Wow, that's another week down!

It was a busy weekend for us with lots to do the yard and a birthday celebration for our youngest son (turning 6 on Tuesday)

I got the results back from my previous CT scan and now have to head off this morning for a MRI on my lower back. Can't say I'm looking forward to it. But on the advice of a good friend I'm just going to enjoy the fact that there is no house work or children to look after for a fabulous 20 minutes while I am stuck in the tube and I plan to take a wee little Nanna nap while I'm in there, lol.

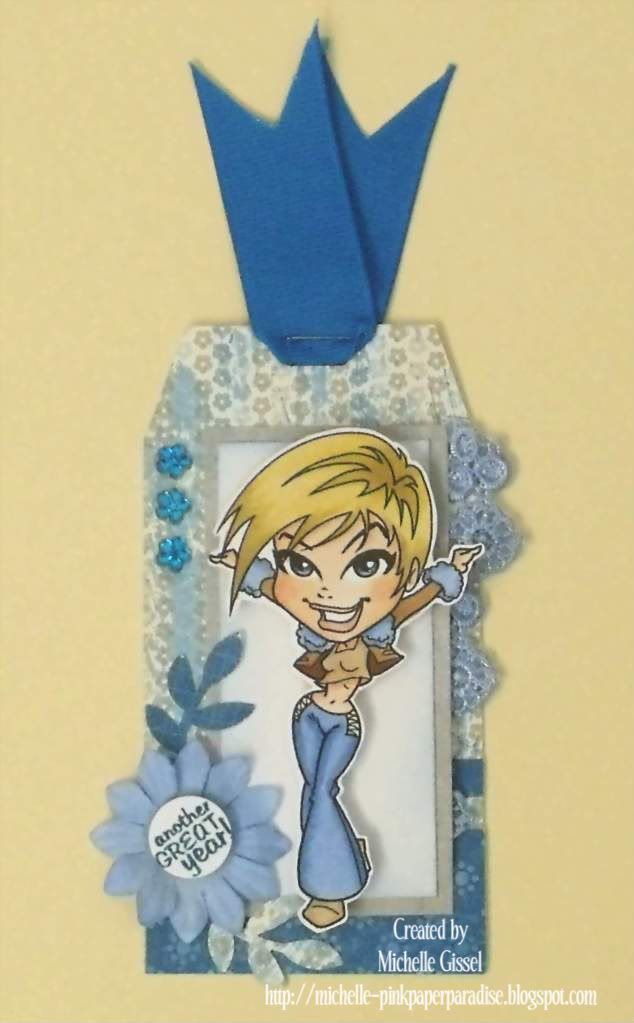
I didn't really get much opportunity to do a lot of crafting this week but I did manage to finish off a little project I started at my friend Shannean's house last week when we met up with another lady  for a day of guilt free crafting.

I thought I would share it for this week's Make It Monday linky party.


 I have made a few of these drawers before that you can see here and here.


The papers are from Stampin' Up! as is the sentiment.


Shannean just happened to have the perfect brads for me to use on the drawers.


Flower was made using a spellbinder die

Ok, now you have seen what I am sharing this week at Make It Monday.

Let's see what you've been creating!


We are sponsered by 

http://disdigidownloads.blogspot.com/

and they are offering a $10 gift voucher.

To be in with a chance to win this fabulous prize all you need to do is leave a comment on an entry in this week's linky party. Be sure to mention you saw them on MIM. The more entries you comment on the more chances you have of winning.

How easy is that?!

The talented Design team and come up with some beautiful cards to start the linky party off this week. Please be sure to stop by their blogs to say Hi too.

Now, here's the tough part of the job, lol picking just one entry  to  feature here as my pick from last week.

Oh boy , with 256 entries to choose from it really is a difficult choice.

This week I would like to feature


apart from the fact that this card is just so amazingly beautiful I thought it was special too because she has incorporated some crochet lace that was made by her late Grandmother.

Can you see how she has threaded the thread through the buttons, wow, great detail!

Please head on over to Birgits blog to see this in more detail.

Thank you so much for sharing this special card with us Birgit.

And thank you for stopping by today. I hope I see you and your creation over at Make It Monday soon!

Michelle :o)

Monday, December 19, 2011

Make It Monday #68 with Crafty Emma's Store

Well hello there!

Long time no post hey!

I'm sorry about that and I have really missed being creative too. But I'm sure you all know how it is when life just seems to get in the way.

It is the end of year school holidays here in Australia now, so my boys are on six weeks holiday and that is keeping me pretty busy to say the least.

I'm popping in today because a new Make It Monday linky party starts today and I actually have something to share this week, yay!

A few weeks ago I was madly making up dozens of gifts for my son's teachers and teacher aids and some for the lovely ladies that I work with in the school office.

I had almost given them all out when I suddenly realised I hadn't taken any photos of them, eek! Luckily I had a couple left and I quickly snapped a few shots so that I could share them with you this week.


I made a whole swag of these refillable (has a flip top lid) coffee bag dispensers. They are so quick and easy to make.


Ok now, you've seen what I'm sharing for Make It Monday this week, let me see what you have been busy making.

This week's MIM linky party is sponsored by the lovely Emma from


and she is generously offering a £10 voucher to her store.

To be in with a chance to win this fabulous prize all you need to do is leave a comment for another entrant letting them know you saw them on Make It Monday. The more entries you comment on the more chances you have of winning.

The incredibly talented girls on the MIM design team have created some gorgeous cards to help get you all inspired this week and you should definitely head on over and check them out, but before you go let me share with you my favourite entry from last week's linky party.


It has to be this fabulously fun card from


I love the fun image and the pretty colour combo!!

Thanks for sharing with us Kerry!

Please head on over to Kerry's blog and let her know you saw her here!


So come on, share your paper creations with us over at Make It Monday this week! New or old it doesn't matter. It's all about sharing the inspiration and making some new blogging friends along the way.

Happy Holidays!!

Michelle :o)


Thursday, June 9, 2011

Mad For Markers - Tag Sketch


Hi there Copic fans!!

I'm here today to remind you that there are just a couple of days left to get your submission in to the current Mad For Markers challenge.

The Design Team have been posting daily with fabulous examples of how you can use the sketch and the submissions to date are just fantastic.

I don't make a lot of tags so I was tempted to just make a tag shaped card this week but then I decided to step out of my comfort zone and just go with the straight tag. I'm actually pretty happy with how this turned out in the end.


Image is from Kenny K and papers from Stampin Up!. I have coloured the flower and lace with Copic Marker B21.

The following Copics have been used to colour the image

Skin - E00, E000, E11 and R20
Hair - Y21, Y 23, Y26 and Y28
Clothes and Shoes - E30, E31, E33, E34, E35, E37, B21, B23, B24

My fellow Design Team member,  Melissa, has come up with this fabulous tag sketch this fortnight and it is up to you how you use it, you might want to make a tag, incorporate the tag on to a card or maybe make a tag shaped card, it's up to you.


As I said, there are only a few days left of this challenge but time enough for you to get your entry in.

Head on over to the Mad For Markers Challenge blog and check out the Design Teams ispiring makes and the entrie so far.

For all your Copic and related supplies head on over to Mad For Markers online store.
Mad For Markers post to Australia and New Zealand and stock a large range of Copic Markers, Blending Card, Masking Paper etc.

You can also check out the store blog and challenge blog for tips, tutorials and inspiration.
Thanks for stopping by
Michelle :-)

Thursday, May 26, 2011

Mad For Markers - Colour your Embellishments

Hi there Copic fans!!

How have you all been? I feel like I have been a way for a very long time but in reality I haven't been away at all, just sick!

With the Blogger melt down, continued issues with commenting and catching this horrible flu, blogging has been taking a bit of a back seat.

But I have managed to create a little something for the current challenge over at Mad For Markers.
The challenge this fortnight has been to colour your embellishments with your Copic markers.

I decided to create a tag/book mark.

I used "Club Kid" from Kenny K


I have coloured the lace and flower with R81


and the rhinestones that were a very pale pink I darkened by colouring them with R83


Copics used to colour this image

E000, E00, E11,
 R20, R81, R83, R85
E25, E27, E29,E30, E31, E33, E35, E37,

There is still a little time left to enter the current challenge over at Mad For Markers.

We would love to see the creative ways you can use your Copic markers to colour embellishments.

Thanks for stopping by today.

Michelle :-)

Saturday, December 4, 2010

Teacher's gift and a few random photos

Hi

I hope those of you facing extreme weather conditions be it in England the USA or closer to home in Victoria, ACT and NSW are all staying safe.

I have some quiet time to myself tonight as my husband and boys all crashed out early.

Thought I would post another one of my teachers gifts (actually for a very sweet teacher aid).

I just love these acrylic post it note stands, so quick and easy to make.


I made the paper flower using a three different sized five petal flower punches. Hand made flowers is the challenge over at Oh Alice Challenge Blog  so I will link my project up there. This is the first time I have joined in with one of their challenges so I hope it meets all the criteria.

I also managed to finish rearranging my crafting space today. My desk and a few of the shelves still need to be tidied up but it's pretty much done. So I thought I would share a couple of photos as it probably wont stay this clean or organised for long.


As you can see it is nothing flash, a real mish mash of furniture, but I love it and I feel so lucky to have a room for my craft so that I can leave it all set up and not have to pack it away each evening.

Although I really should get around to putting up a curtain seeing as how we have been living here for over three years now!


My gorgeous little guys were also industrious today. They managed to decorate the Christmas tree. I think I had just as much fun watching them as they had doing it.


there was of course some fighting (three boys...c'mon you knew there had to be)


But in the end they did an absolutely amazing job.


Now we wait for the big guy in the red suit to make his appearance.

Hope you are all having a fantastic day!!

Thanks for stopping by today.

Michelle :-)

Tuesday, November 16, 2010

Teacher's Gift Request

.
Hi

I hope you are all having or have had (depending on your geographical location) a good day.
Mine was not so crash hot.

I had been feeling a little off colour yesterday but woke up today with a really horrible tummy bug. My DH was up and gone to work early and wouldn't be home till late and I was in no condition to drive the boys to school today so the three of them were home with me.To really make sure the day went as badly as possible,  today was the day the electricity was scheduled to be off from 8:30am to 5pm for maintenance. So the poor boys couldn't even watch tv or play on the computer to entertain themselves. Stinking hot and humid here as well and no aircon, so all in all, a fabulous day, NOT!

Anyway, enough whinging! On to a little gift set I wanted to share with you.

I made this calendar stand last week for a friend who had requested something suitable for her daughter's male teacher.


A frame stand is made from cardstock and designer paper. I have given it a coat of Modge Podge for strength and durability.


I still have about eight more gifts sets to make for my kids teachers so I better get more organised!

Atleast I am feeling a bit better this evening so I should be right for tomorrow.

Another bit of good news is that my Dad has finally (after four weeks in the hospital stroke ward) been transferred to a rehab centre. It is closer to their home so it makes it easier for my Mum and apparently she can take Dad's dog (who he loves to death) in to see him. That will give him a real boost.

Just a reminder too that the Make It Monday linky party is open at the top of my blog.

You have plenty of time to dig through your blog archives and find a fabulous project that you want to dust off and show off to everyone, or you could link up your most recent.

There is no theme, anything goes. It's all about sharing the creativity and gaining some inspiration.

Thanks for stopping by today.

Michelle :-)

Friday, July 2, 2010

Paper Cubed (P3) July Challenge

.
Hi

Well, here we are, July already!

Good news is it's time for another challenge over at Paper Cubed (P3). This months challenge is to make a table top decoration. It can be any theme or style you would like, just make it something you would use to decorate a table.


I decided that since my son is having his 6th birthday next month I would make something to go on the table for his party.


Train engine measures approximately 30cm long x 10cm wide and 30cm high.

Carriage measures approximately 19cm long x 10cm wide and 12cm high.

I basically just made it by joining a series of boxes and cylinders togther. There was a fair bit of trial and error involved but I'm really happy with how it turned out and I know my boys will be thrilled with it. Keeping it out of their hands will be another story. I think after the party it will have to go up on a shelf in my sons room or it wont last five minutes.

Hop on over the the Paper Cubed (P3) challenge blog and check out the rest of the design teams wonderful creations. I hope you will be inspired to join in the fun.

The prize this month is a TIM HOLTZ STAMP SET and GRUNGE BOARD!

You have the whole month to get your creation in.


Thanks for stopping by today. Have a great day!!

Michelle

Sunday, May 30, 2010

Dump Truck Party Favor

.
Hi

Well I have had this idea in my head for while now, since making the big red truck for my Dad a while back.

I'm  a bit grumpy with myself for getting dirty glue finger prints all over this project but hey, it's a dump truck right, they are supposed to be dirty!


Truck measures approximately 19cm x 11cm (7.5" x 4.3").

Perfect size to hold a bag of lollies for a boy's party.

Don't forget my birthday blog candy is open until 21st  June, click here to enter.

Thanks for stopping by.

Michelle

Linking up with:


Saturday, May 22, 2010

Back to Crafting but out of practice

.
Hi

It's been a good couple of weeks since I sat in my craft room and had a play around with my paper stash.

Tonight I sat there for a while and wondered what to work on and I decided that I wanted to have another go at making a shadow box. My first attempt here was designed for a little girl, this time I wanted to make something a little more grown up and that I could put some co-ordinating cards in (haven't made them yet).


I'm sorry the photo is of such poor quality.

I added a sliding drawer in to which I want to place a set of co-ordinating cards. But that is a project for another night.


This months challenge over at Paper Cubed (P3) is to create a shadow box. It can be any sort of shadow box. Hop on over and see some of the other Design Team members amazing creations and also the terrific entries that have already been submitted. You still have until the end of the month to submit an entry and be in the running for the prize.

Recipe:

Freinds 24-7 stamp set - Stampin Up
Close to Cocoa and Very Vanilla cardstock - Stampin Up
Bella Blue Designer Series Paper - Stampin Up


My birthday blog candy is still open, click here to enter.

Thanks for stopping by.

Michelle


Thursday, May 20, 2010

Still no cards but something different

.
Hi

Gosh it,s been a while since I sat down with some gorgeous paper and made a card or 3D project and I miss it heaps!

But I did get an order the other day for four  personalised Brag Boards (you can see more of my wall art over at JeMbellish).


I use a 45cm x 45cm x 1.8cm canvas for the Brag Boards.

The background colour is painted with acrylic paint and the lettering and stars are cut from co -ordinating cardstock and stuck with clear drying glue. I give it a few coats of clear varnish to protect it and then add some ribbon on the front with coloured clips to hang the childrens artwork, certificates or photos and some string on the back to hang on the wall.

I have finished three and the last one is almost done so I'm hoping to make a card or two in the next few days!!

I have linked this post up with House of Hepworths . You should pop on over there and check out some really really creative ideas.


Dont forget to enter in to my Birthday Blog Candy Give Away here.

Thanks for stopping by.

Michelle

Saturday, May 1, 2010

Paper Cubed (P3) May Challenge

Hi

Happy 1st May!! Can you believe it! 40 is sneaking up on me real fast now!

And more importantly it is time for another challenge over at Paper Cubed (P3).

If you haven't hopped on over to this fabulous new challenge blog you are missing out on a lot of fun.

Each month there is a new challenge and this month the challenge is to make a Shadow Box.

I am absolutely thrilled to be on the first design team and this is my submission or should I say submissions for this months challenge.


Now I have never made a shadow box before so this was quite a challenge for me. Any of you who are familiar with my blog will know that I am quite partial to creating things with drawers and adding notebooks and pens/pencils to most of my projects. So with that in mind..............


I just had to add a little sliding drawer behind it and pop in a little notebook and pencil set!


I had so much fun making this and I had it finished pretty early on  so I decided to have a go at making a different shadow box.

I had a big old box in the spare room that our new LCD TV came in and I thought I could use the really thick cardboard from it to make something.

I cut a piece of cardboard for the backing board and one for the frame.


I used a piece of clear acetate instead glass and then covered it all with brown cardstock and some decorative paper to match the paper butterflies.

The butterflies are popped up on dimentionals and there are little tiny rhinestones in the centre of the them  and rhinestone flowers in the corners.

I think I might have to add these to the selection of hand made gifts available over at JeMbellish as they were so much fun to make.

Thanks for stopping by and don't forget to hop on over the rest of the design teams blogs

Melanie
Anna
Lorrinda
Sandy
Tammy
Charlene

and check out their amazing shadow boxes. And then don't be shy, make your own shadow box and link it up with Mr Froggy ( you have a whole month!) over at Paper Cubed (P3) to be in the running to win the monthly prize.

These projects also qualify for the One Stop Craft Challenge - Anything But.........

I'll come back to this post in a while (dinner time now) to add the recipe for these projects.

Have a great day!

Michelle

Saturday, April 24, 2010

Still playing with the Big Shot

.
Hi

I hope all of you here in Australia have had a great start to the Anzac day long weekend.

I have been having a lot of fun playing with my new Big Shot.

This little combo was made for our upcoming Market Stall the day before Mothers Day next month. I thought it would make a lovely little gift.


The mini handbag was made using the Top Note and Scollop Circle on the Big Shot (of course!).

Recipe:

Very Vanilla and Riding Hood Red cardstock - Stampin Up
Candy Lane Designer Series Paper - Stampin Up
Garden Whimsy stamp set - Stampin Up
Sentiment - Best Yet stamp set - Stampin Up

Have a fantastic weekend every one!!

Michelle

Thursday, April 15, 2010

Paper Cubed (P3) April Challenge

Hi

The lovely Kim over at Paper Cubed (P3) has set another great challenge this month asking us to create a project using this gorgeous piece from Wendy Vecchi at Studio 490  as our inspiration.


A little while back on the JeMbellish blog I set myself a challenge to use up some sturdy cardboard boxes that I had been storing because I thought they were too good to throw out and would surely be useful for something creative.

I used the thick cardboard from the box to create the backing board and frame for this piece that I submitted in the April P3 Challenge.


Recipe

Brown cardstock for frame -lge A3 sheet from unknown source
Pumpkin Pie and Not Quite Navy cardstock from Stampin Up
Washington Apple Designer Series Paper from Stampin Up
Handmade flowers made using 6x6 designer papers from Stampin Up
Petal Pizzazz stamp set from Stampin Up
Garden Whimsy stamp set from Stampin Up
Old Olive, Pumpkin Pie and Not Quite Navy Inks from Stampin Up
Hodge Podge oval metal frame from Stampin Up
glass beads on wire from unkown source.

The Paper Cubed (P3) challenge blog is relatively new and for those of you who are interested in making 3D projects it is a fun and inspirational blog well worth a look.

Thanks for stopping by today.

Michelle

Sunday, April 4, 2010

Feeling Framed

.
Hi
I seem to be feeling in a framing kind of mood lately.

If you head over to the JeMbellish blog you will see a framed door plaque I made for my youngest son's room this afternoon.

I set my self a challenge yesterday to use up a couple of boxes that I stashed in my craft room for the last few months. They were really good sturdy boxes that my son's school supplies came in and I thought they would be useful for something one day.

I made this wall hanging last night.

First I cut a backing board and a frame from one of the cardboard boxes and them cut some co-ordinating cardstock and papers.


Then it was simply a matter of putting it all together.

First is the backing cardboard, then I layer the co-ordinating cardstock and Designer paper and stamped image. Over that goes the cardboard frame cut out.

The brown cardstock goes over the cardboard frame, it is a piece large enough to wrap around the the back of the cardboard backing. I have cut a window in the brown cardstock to frame the image.

The back of the frame looks like this


I gave the whole thing a coat of Modge Podge to seal it all.

Recipe

Whisper White and Rose Red Cardstock from Stampin Up
Brown Card stock from craft store
Rasbery Tart Designer Paper from Stampin Up
 Real Red,Old Olive and Cameo Coral Stampin Up  Stampin Write Markers
Flower Fancy stamp set from Stampin Up

Please pop on over to JeMbellish we'd love to see you there. Check out the boys room Door Plaque and see all of the other creations too.

Thanks for stopping by.

Wednesday, March 31, 2010

Photo Frame Tutorial

.
Hi
Today I am posting a tutorial for a quick little photo frame.

I apologise for the quality of the photos, I really must learn how to take better photos.

This is the completed free standing photo frame.


To make this photo frame you will need the following supplies

(please keep in mind that I have done my best to work out the measurements as exactly as possible but I typically just work stuff out as I go along so you will need to check all measurements against your own work)


2 - 13cm x 13cm x .6cm chip board squares
1 sheet of clear acetate
Designer Paper
Cardstock
Thin ribbon
Embellishments
Double sided Tape
Paper Cutter
Craft Knife
Hole Punch
Modge Podge
Paint brush (for the modge podge)


Cut the following:

Designer Paper  - 14.2cm x 14.2cm
Cardstock - 10.6cm x 11.8cm
Clear Acetate - 13cm x 13cm

Cut the following pieces from one of the chipboard squares:

2 strips -13cm x 1.2cm
1strip - 10.6cm x 1.2cm
Rectangle - 10cm x 4.5cm


(please excuse the hair on the lense in this photo that I only just now noticed as I have uploaded the photo).

Punch holes through your chipboard square and large rectangle as shown in photo. Hole will need to be about 2cm from the bottom edge.

Make a cut across the top of the large rectange approximately 2.5cm from the top edge, but don't cut all the way through the chipboard. This rectangle will be the stand at the back of the frame. The small piece above the cut is where the double sided tape goes to adhere it to the back of the frame. The cut creates the hinge effect.

Place some double sided tape on the back of the thin strips and above the cut on the large rectangle.


Stick the strips of chipboard to the sides and bottom of the chipboard square.
Thread a piece of ribbon through the hole and tape in place.
The other end of this ribbon will go through the hole in the large rectange piece later on to work as a stopper so that the stand can not be bent too far back and break off.


Using double sided tape stick the cardstock down on to the chipboard to cover the ribbon.

Place strips of double sided tape around the edges and stick down the acetate square. (dont stick the acetate down at the top! This is where your photo will slide in and out)


On the back of the square of designer paper score .6cm (6mm) on all sides.

Then draw lines at 1.5cm all the way around.

Using your craft knife cut out the small square that you have drawn in the middle.


Run strips of double sided tape all the way around the back of the designer paper as shown in photo.

Cut two cuts on either side at the top and bottom of the square just to the .6cm score line, so that when you go to wrap the paper around the edges of the frame you get a much neater corner.

Cut a rectangular slit at the top of the designer paper as shown in the photo. This will be where your photo will slide in and out. This rectangular slit needs to line up with the square you have cut out in the middle but only needs to be about .3cm (3mm) wide.


Now stick the designer paper down on to the frame making sure to line the slit you have cut in the top of the designer paper with the opening at the top of the frame.


Now you can stick the stand to the back of the frame.

Thread the ribbon through the hole and tape it in to place.


Decorate the front of your frame with your chosen embellishments and then give it a coat of Modge Podge to seal it all.


I hope that this tutorial has made sense. It always seems to be that I do these very late at night! Please leave me a message if you have any questions.

Thanks for stopping by today.

Michelle